Installation & Positioning
AlertOlarm has been designed to be easily self installed, with only limited/no technical ability needed, especially if using the battery only options.
Installing & Positioning the PIR sensor.
Firstly, please remember that the stardard PIR sensors supplied are NOT waterproof. Therefore they should not be used externally and internal environment should dry and free of water ingression (Max 85% humidity).
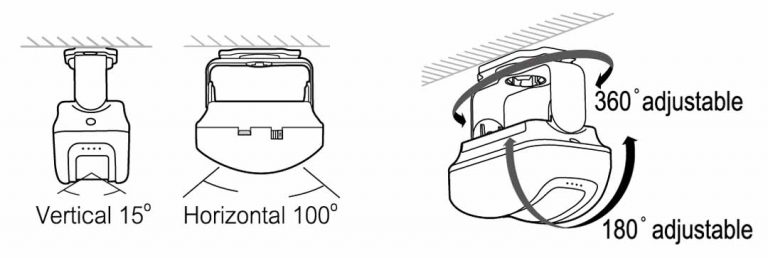
1. Prior to installing the PIR sensor, take time to consider the best location for the PIR is term of protecting the area/entry point you wish to safeguard. As per the ‘Whats in the Box’ help page, the PIR sensor has a range of 2-8m and a sensing angle of 100 degree in the horizontal plane and 15 degrees in the vertical plan. Once in place the PIR sensor can be further rotated to 360 degrees in one direction and 180 in the other. This said the distance to protection point is usually the critical aspect e.g. if wanting to cover a door with two window directly adjacent to them, then positioning the PIR on the ceiling, approx 2-3m away, pointing down to halfway down the door and window, should protect both doors and window. However if protecting just a single entry point, e.g Garage/Shed door, then you may want to position the PIR sensor directly above the door itself, pointing vertically down etc. Ultimately, due to its multi-position protocols, the PIR sensor can be mounted to ceiling, side walls, above doors, on racking etc etc and so long as it is not more than 8m away from the point you wish to safeguard then it will be able to be positioned to alert of entry to those areas. NB, The PIR sensors work best in an environment of ambient temperature and extremes in hot and cold can effect the overall range, we therefore recommend installing the PIR as close to the entry point as possible if placing in places that you expect vary in temperature.
To prevent false alarms etc, we recommend NOT installing near (or directing to) air-conditioning ports, fans or any place where there are large temperature changes (within short period of time). Also to stop rodents of small animal setting of the PIR sensor we always recommend directing the sensor to mid height of the door, window, room etc.
Finally prior to starting the installation we recommend testing the preferred location by holding the unit in place and asking someone to move through the area you wish to safe guard. If powering the unit using the USB charger then consideration should also be taken to ensure the PIR is positioned near to a power feed and you have a long enough USB cable to reach from PIR to the power supply (obviously not needed if relying on batteries alone).
2. When installing the PIR sensor there are two parts to the unit. The adjustable mount and the PIR sensor unit itself. We recommend fixing the adjustable mount first. If using the self adhesive double sided pads provided, then please ensure you have degreased the surface to which it is to be adhered to first. Once degreased please ensure the surface is clean and dry before apply the pad to the surface. To apply to surface we recommend 1st peeling off the application paper to one side of the sticker and pressing it will a firm press onto the back of the adjustable mount. Then peel the application paper off the other side of the sticker and press the adjustable mount into position.
If using the wall plugs and screws then consideration should be made to the type of surface you are intending to mount to. If screwing to wood surfaces then we recommend simply using the 2 x screws provides. If softwood, there may be no need to drill the surface 1st, yet if hardwood, then pre-drilling the surface with a small diameter (smaller than screw) drill is recommended (2 x holes). If screwing to metal again we recommend simply using the 2 x screws provides. Pre-drilling the surface with a small diameter (smaller than screw) and screw the adjustable mount to the surface. For brick/concrete we recommend using the 2 x wall plugs and 2 x screws provided. First drill 2 x holes into the surface with a masonry drill bit (the same diameter as the wall plugs). The screw the adjustable base into the wall plugs using the screws provide.
Once the adjustable base is in the desired position then snap the PIR sensor into the base. To do this slightly and gently pull the projecting arms up be approx 2-4mm, align the male lugs on the insides of the arm with the holes on the arms to the back of the PIR sensor and push into place. The two halved and the PIR sensor should now be in position.
3. Once in position the PIR sensor can be re-directed on two planes by gently twisting the PR senor left to right, or by pushing gently up and down. There should be a slight clicking motion in all directions. Be careful not to re-position/twist constantly as this can ware the ‘click stop’ mechanism.

Installing and positioning the Audible receiver unit
1. Free standing Audible receiver unit. For the users convenience and flexible of use the Audible siren unit has been designed to be free standing and in this manner it can be located virtually anywhere, where there is a flat surface (Window sills, desks, tables, shelves, floors etc ).
The main consideration when locating the Audible receiver is the distance it is from the the PIR sensor/s. Although with clear line of site between the Audible receiver and the PIR sensors, can see the units being up to 280m apart, solid article such as brick walls, heavy insulation, thick metal, high energy electrical equipment, oscillating electrical goods, radio equipment etc can reduce the overall distance between the items. We therefore recommend where position to locate the Audible receiver unit so to limit the number of obstructing articles between the devices. Often allowing clear line of sight will achieve the best result, e.g. If the PIR sensor is inside a shed which is at the bottom of a garden, then often placing the Audible receiver on the window sill of a 1st floor window facing the shed, should see good connectivity between the two unit at distance. Another example would be, if you park your Van on the drive or street and the PIR sensor is protecting the rear inside of the vehicle (position the PIR sensor high in the Van so not to be blocked by heavy metal racking, metal tools, drills etc around the edge of the Van), then again, place the Audible receiver unit on the window sill of the first floor window facing the drive or the street. The latter will ensure the best connection range possible between the devices.
If you are using the AlertOlarm system as a deterrent and to move the thief on, then often the Audible receiver, will be located in the same environment as the PIR sensor. In these situation we would recommend a distance of at least 3m apart from PIR sensor to Audible receiver unit and the Audible receiver to be placed out of site if possible (not placed in a draw or toolbox which will reduce the alarm volume too much). This would hopefully see the thief fleeing the scene prior to being able to reach the Audible alarm unit. Also in these environment we would also recommend adding a 2nd Audible receiver unit to the overall system, that could be placed at distance in a house, office etc to warn the owner of an intruder also.
Again if wanting to use USB mains power for the Audible receiver unit, ensure you locate the device as near to possible to a mains power supply from which a USB cable can be extended (obviously USB cables can be purchased at variable lengths or electrical extension cables can be used also if needed). This said, most still rely on battery power alone to power the Audible receiver units.
2. Wall mounted Audible receiver unit. If wanting to place the Audible receiver unit so that it acts as a theft deterrent in the same environment to where the PIR sensor is installed then many client would look to secure the device to a wall/racking/shelving etc, to reduce its vulnerability. Such environments would be, when protecting a vehicle, farm building, sheds etc. To allow this there is a key hole fitting to the rear of the device (3). Simply find a screw with a screw head size very slightly smaller than the larger part of the keyhole toward the bottom of the hole (yet larger the the width of the slot hole above). Screw the said screw into the surface you desire, so that the head of the screw protrudes approx 4-5mm from the surface. Slide the large hole (on the keyhole to rear of device) over the screw head and pull the device downward such that the screw slides into the slotted part of the hole. If the unit is loose and can swing etc we recommend removing the device (push up and pull away when screw head aligned with large hole) tighten the screw inward to the surface and trying again, until the unit if firm and do not swing.
Finally and again if wanting to use USB mains power for the Audible receiver unit, ensure you locate the device as near to possible to a mains power supply from which a USB cable can be extended (obviously USB cables can be purchased at variable lengths or electrical extension cables can be used also if needed). This said, most still rely on battery power alone to power the Audible receiver units.
is proudly powered by WordPress